You generated a track with Suno or Udio. It sounds decent in the preview. But you want it to sound like a real release — clean, loud enough, ready for Spotify or YouTube. This guide covers everything you need to know.
What mastering actually is
Mastering is the final step between your mix and the listener. It does three things:
- Makes the track loud enough to compete with other releases
- Removes technical problems — clipping, harshness, imbalance
- Ensures the track sounds good on every playback system — earbuds, speakers, car stereo
For AI music, mastering is more important than for traditional music. AI generators optimize for their own preview players, not for streaming platforms. The gap between "sounds good in Suno" and "sounds good on Spotify" is real and fixable.
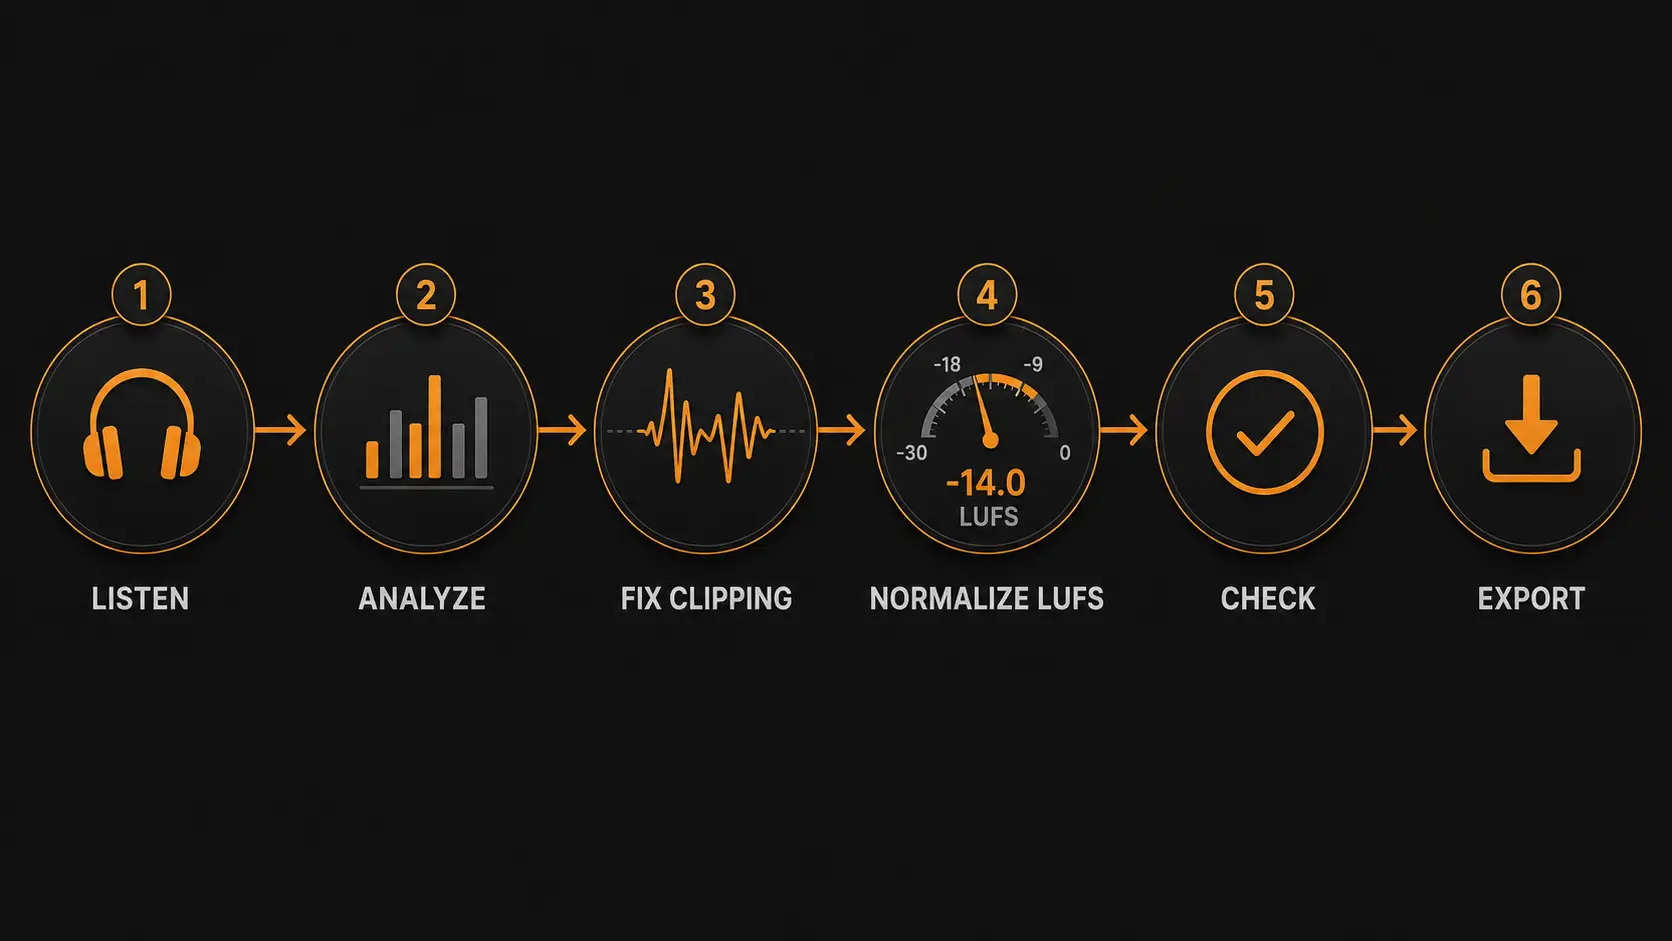
Step 1: Listen critically before you do anything
Before touching any settings, listen to your track on different devices. Phone speaker. Headphones. Laptop speakers if you have them.
Listen for:
- Harshness or distortion on loud moments — that's clipping
- Low end that's too heavy or too thin
- Vocals or instruments that disappear in the mix
- The overall loudness compared to tracks you like
Write down what you hear. This is your target list.
Step 2: Measure your starting point
Before mastering, measure your track's integrated LUFS. This tells you how far you are from the target.
In WaveDisco, the loudness analyzer shows LUFS in real time as the track plays. In Audacity, use Analyze → Measure Loudness. In any DAW, a loudness meter plugin works.
A typical Suno track measures -10 to -12 LUFS. Your target is -14 LUFS for most platforms. So you need to reduce loudness by 2–4 dB while controlling clipping.
Step 3: Fix clipping first
Never normalize loudness before fixing clipping. If you turn down a clipped track, you get a quieter clipped track. The distortion is still there.
Apply a true peak limiter with ceiling at -1 dBFS first. This catches every peak that exceeds the ceiling and brings it under control. The track's integrated loudness barely changes — you're only affecting the extreme peaks.
In WaveDisco this happens automatically. In Audacity: Effect → Limiter → set to -1 dB soft limit.
Step 4: Normalize to target LUFS
Now bring the integrated loudness to your target platform:
- Spotify: -14 LUFS
- Apple Music: -16 LUFS
- YouTube: -14 LUFS
- SoundCloud: -10 LUFS
If you're releasing everywhere, master to -14 LUFS. It's the best universal target.
In WaveDisco: select the platform and click process. In Audacity: Effect → Loudness Normalization → set target.
Step 5: Check the result
After processing, verify:
- Integrated LUFS is at or near your target
- True peak is at -1 dBFS or below
- The track doesn't sound squashed or pumped — dynamics should feel natural
- The elements you identified in Step 1 are improved, not worse
If the track sounds over-compressed or lifeless, the AI generator may have applied too much processing before export. Some Suno tracks are already heavily limited internally — there's a limit to how much you can fix in post.
Step 6: Export correctly
Export format matters more than most people realize.
For streaming upload: WAV, 24-bit, 44.1kHz or 48kHz. Never upload an MP3 that was converted from another MP3 — each conversion adds artifacts.
For sharing or social media: MP3 at 320kbps is acceptable. Below 256kbps you'll start hearing compression artifacts on cymbals and high-frequency content.
For archiving your masters: WAV, 24-bit always. Storage is cheap. Quality loss is permanent.
Common mistakes
Normalizing without limiting first. If your track clips at -10 LUFS and you normalize to -14 LUFS, the clipping moves down with it. Fix peaks before normalizing.
Using MP3 as a source file. If Suno gives you an MP3 export, that's your source. Don't convert it to WAV hoping to improve quality — the information lost in MP3 encoding is gone. Work with what you have, but don't add another lossy conversion step.
Over-processing. Mastering should be transparent. If you can hear the mastering, you've done too much. The track should sound like itself — just cleaner and more balanced.
Ignoring the mono check. Play your track in mono. If the bass disappears or elements sound different, you have phase issues from the AI generation. WaveDisco's analyzer shows stereo correlation — check it before export.
The fast version
If you want results in under two minutes:
- Open wavedisco.com
- Drop your Suno or Udio track
- Select your target platform
- Click process
- Download and upload to streaming
That's it. The studio handles limiting, normalization, and true peak control automatically. Free in the browser.
What mastering can't fix
Mastering fixes technical problems. It doesn't fix creative problems.
If the melody is boring, mastering won't help. If the arrangement is cluttered, mastering won't fix it. If the AI generated something that sounds fundamentally wrong for what you wanted — generate a new variation.
Mastering is the last step, not the rescue step. Start with the best source material you can get from the generator, then master it.